
You added a shirt and a pair of trousers to the same cart three times this week, and the discount still never landed. Each product looks healthy on its own inventory page, and checkout treats them as strangers. If you're working out how to create a bundle on Shopify, the button is the small part. The decision that protects the order is whether the kit can be fulfilled, priced, and reported when one component runs out first.
I'd start there. Pick the method that matches how customers choose, confirm the store can run bundles at all, then build one fixed kit and read a test order before you promote anything.
Table of Contents
- Choose a Bundle Method and Check Shopify Limits
- How to Create a Fixed Bundle Step by Step
- Set Bundle Pricing and Discount Allocation
- Plan Inventory So Bundles Never Oversell
- Show Bundles in the Cart and Test Before Launch
Choose a Bundle Method and Check Shopify Limits
| Method | Bundle types covered | Setup effort | Best for |
|---|---|---|---|
| Shopify Bundles app | Fixed bundles and multipacks | Low, no code | Stores starting with predefined combinations |
| Third-party bundle app | Mix-and-match and configurable combinations | Low to medium | Stores where customers choose components |
| Custom build with Bundles APIs | Any structure | High, needs a developer | Shopify Plus teams with custom cart logic |
The free path is real. Shopify's bundles manual puts fixed bundles and multipacks on every plan, with no custom development. Install the Shopify Bundles app, open Apps > Bundles, select Create bundle, enter a title, choose the component products, adjust quantities or variants, and save. A fixed bundle is a predetermined set of products and variants, which fits complementary items such as a shirt and trousers. A multipack is multiple units of the same product, which fits a repeat purchase such as three units of one consumable.
Customized bundles are a different product. They use cart transformation logic for compositions the shopper assembles, so they need a developer or a third-party app. Fixed bundles only model a defined grouping. If both products always sell together at fixed quantities, stay on the native app. If customers pick from a long list of options, choose the third-party app before anyone opens the admin. A chooser like when you build your Mouthology oral care bundle is that second case, not a fixed kit with a nicer title. More merchandising patterns sit in these examples of product bundling.
Checks before you build
You need an active Shopify store, and you must grant the API scopes the app requests. Shopify also requires a bundles app, an upgraded checkout, and either the Online Store sales channel or a custom storefront. Stores that still depend on checkout.liquid customizations are incompatible with product bundles. I would confirm that checkout point before anyone designs a landing page.
Practical rule: If the quantities never change, use the native app. If the customer is assembling the kit, stop and pick a mix-and-match tool first.
The Shopify Bundles limits guide caps the fixed-bundle system at up to 30 components, three bundle options, and 100 total variants. Combined options count as one option, and nested bundles aren't supported. Count sizes, colors, and scents before you publish, and merge matching options when the math crosses 100. Bundle pricing is distributed across components in checkout, cart, and orders with a weighted-price algorithm, which changes refunds, tax, and what accounting reads.
The three ServeApps apps can be installed from the Shopify App Store, and they work alone or together. If a setting looks wrong while you test, merchants can reach support through the chat bubble in any ServeApps app opened in their Shopify admin.
How to Create a Fixed Bundle Step by Step
The admin path is short. The review after you save is where most kits go wrong.
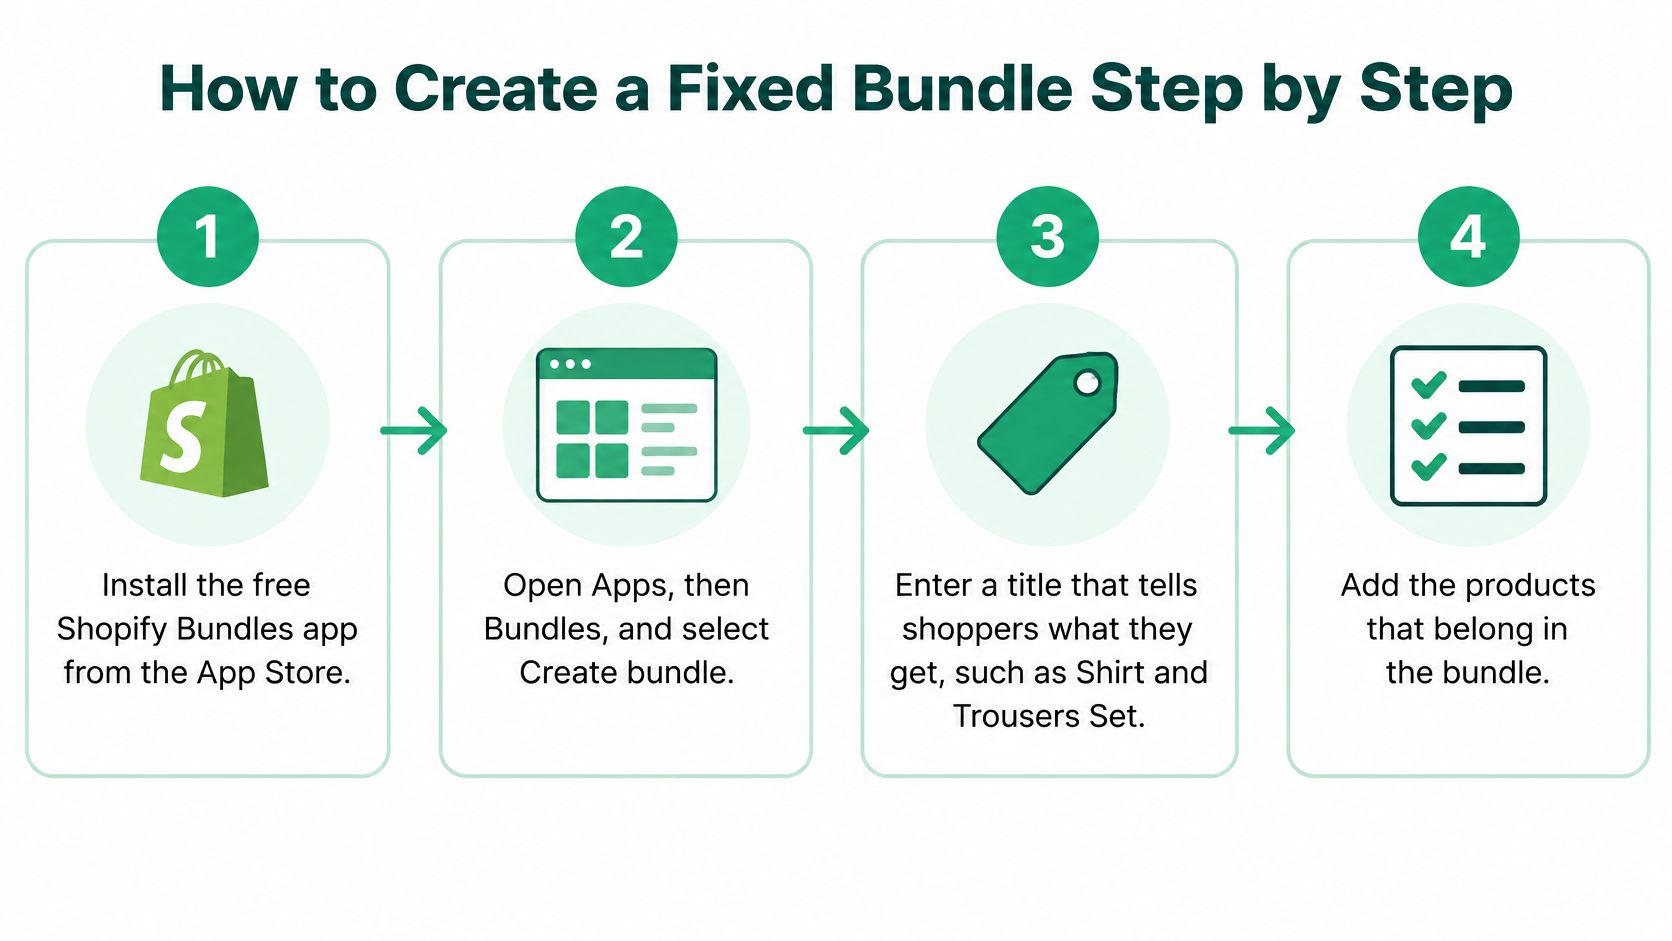
- Install the free Shopify Bundles app from the App Store. Shopify's own app keeps inventory on the component products and presents the bundle as one purchasable unit. Don't stitch the same kit together with metafields and custom cart logic.
- Open Apps, then Bundles, and select Create bundle. This creates a product, not a discount code that happens to mention two SKUs.
- Enter a title that tells shoppers what they get, such as Shirt and Trousers Set. Search results and the cart both use that title. "Bundle" alone doesn't say what's inside.
- Add the products that belong in the bundle. Pick only items you can fulfill together. A slow accessory inside a fast outfit will cap the whole kit.
- Adjust quantities or select the variants for each component. A multipack is the same product repeated. A fixed set is different products at set quantities.
- Save the product. Saving creates the record. It doesn't mean the kit is ready to advertise.
Review the listing before you set it active
Treat the bundle like any other product before you turn it on.
- Title and description: Say what's included and how many of each item. Shoppers shouldn't have to open three product pages to learn the contents.
- Price and images: Show the kit, not a single component photo recycled from the shirt listing.
- Variants: Each bundle variant should map to a real component combination you intend to sell.
- Inventory behavior: Confirm a test add-to-cart reduces component stock, not a fake parent quantity you typed by hand.
When a developer builds the parent product
Shopify's developer docs for bundles use the native model. Create the parent product and its variants with the GraphQL Admin API using productCreate, then attach each component variant and quantity with productVariantRelationshipBulkUpdate.
A safe sequence is: validate that every component variant exists and is sellable, create the parent and its options, attach the components, publish to the sales channels you use, and test inventory depletion, returns, discount allocation, and fulfillment on a development store. Each bundle variant can contain up to 30 component variants. Once an app assigns those components, that app owns the relationships. Don't point a second app at the same kit, or edits become inconsistent or disappear. Shopify allocates discounts from the parent bundle to its component lines, so tax, refund, and fulfillment tools must read those lines. The parent isn't the only inventory-bearing item.
| Limit | Shopify value | What to do |
|---|---|---|
| Components per bundle variant | 30 | Split large kits into separate bundles |
| Bundle options | 3 | Combine matching options into one option |
| Total variants | 100 | Count variants before publishing and cut unused combinations |
| Option combinations | Count as one option | Plan combined options before adding more |
| Nested bundles | Not supported | Redesign as separate bundles |
A kit inside a kit will not publish. Split it into two bundles that can each be ordered on their own.
Set Bundle Pricing and Discount Allocation
Say a shirt is 40 and trousers are 60. Sold separately, the cart is 100. A bundle price of 90 is a 10 percent saving. That gap has to stay visible, and it has to leave margin on both garments after the saving is spread.
| Component | Unit price | Quantity | Line total |
|---|---|---|---|
| Shirt | 40 | 1 | 40 |
| Trousers | 60 | 1 | 60 |
| Full price total | - | - | 100 |
| Bundle price (10 percent off) | - | - | 90 |
The 90 doesn't sit as one mysterious parent discount. The saving is written onto the shirt line and the trousers line in the cart and on the order. Your books, your tax app, and a later refund all see those component lines. If you only check the parent price, you'll miss a line that dropped below cost.
Check margin on every part
- Cost after the split: Take each component's unit cost and compare it with the amount left on that line after the bundle saving. A healthy kit total can still hide a shirt you're giving away.
- Same logic on every variant: A large size shouldn't carry a different discount story from a small size unless the cost differs. Shoppers compare, and so does your finance export.
- Multipack unit price: Three units at a pack price should still show a per-unit figure a shopper can set next to the single. If the pack looks more expensive per unit, the offer fails on the product page.
- Affordable gap: Price the bundle below the sum of the parts by a margin you can say out loud, not a slash so deep that one return wipes the order.
Supplement merchants often show this kind of pack math on discounted supplement variety packs, where the shopper can see the set price against buying each pouch alone. The same comparison belongs on your listing. More price structures are in these product bundling pricing examples.
Place one test order and read three numbers before you launch. The line totals should add up. Each component should carry its share of the saving. The amount charged should match the bundle price, not the old full-price total plus a coupon you forgot to remove.
Plan Inventory So Bundles Never Oversell
The number of bundles you can sell is the component with the least stock, not the average of the kit. Shopify's eligibility notes use a clear case. One unit each of Product A, Product B, and Product C, with 100, 40, and 12 on hand, means you can sell 12 complete bundles. Product C is the bottleneck. Shopify updates that bundle inventory in real time, so the storefront follows sales instead of a number you typed on the parent.
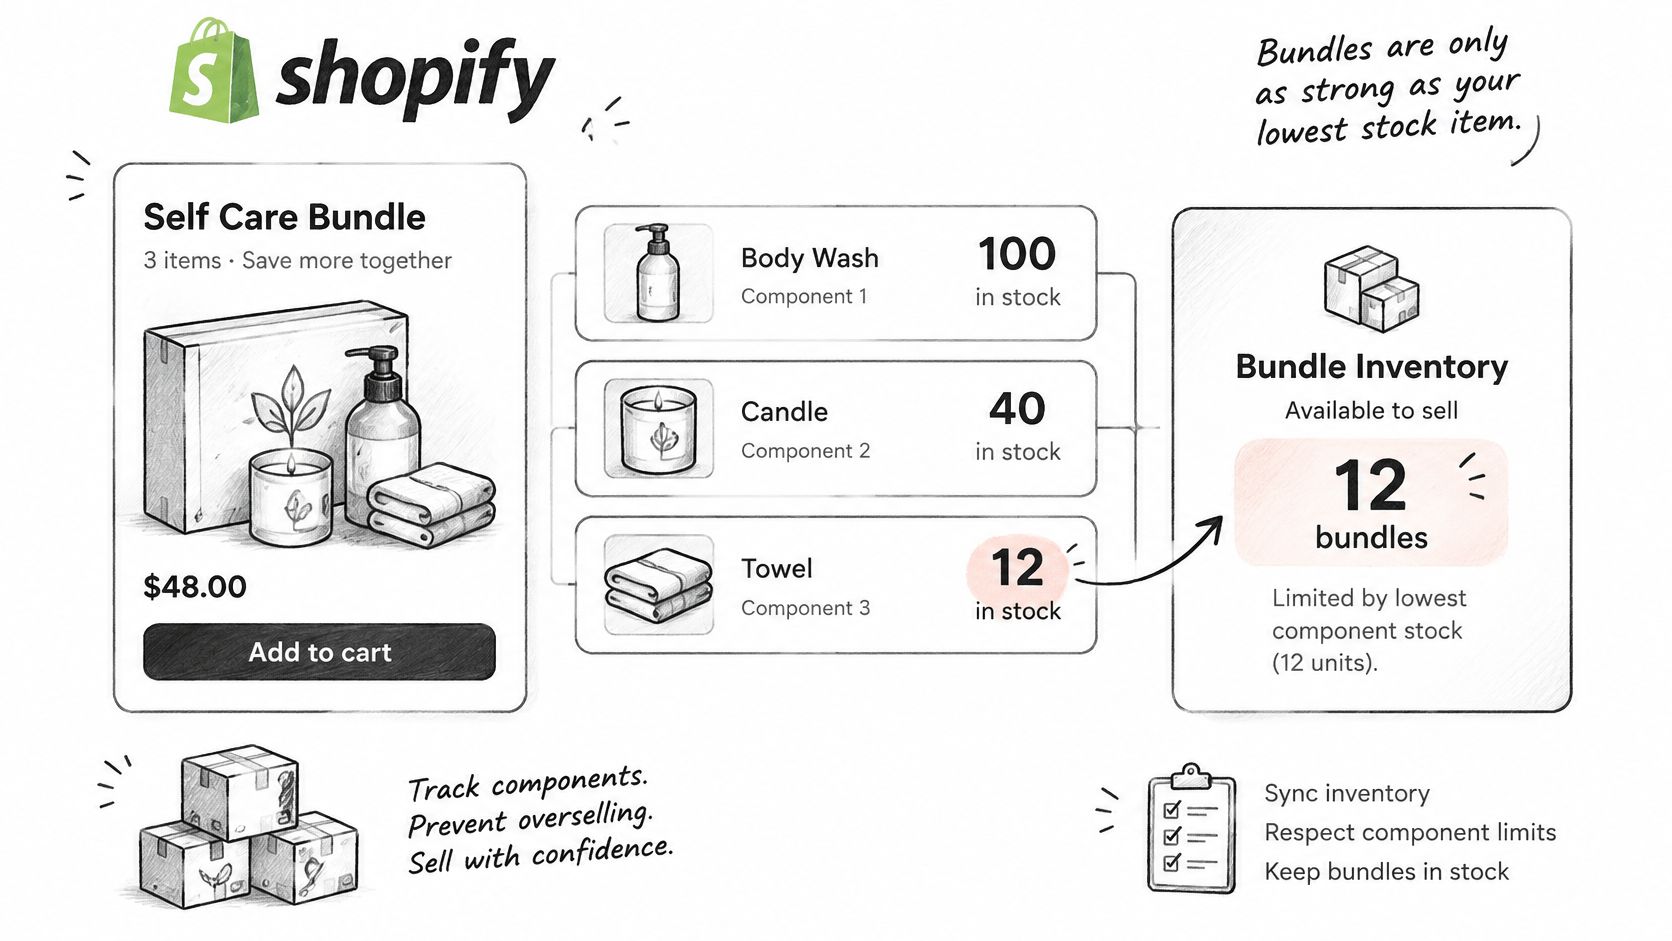
| Component | Stock on hand | Units per bundle | Bundles you can sell |
|---|---|---|---|
| Product A | 100 | 1 | 100 |
| Product B | 40 | 1 | 40 |
| Product C | 12 | 1 | 12 |
| Bundle limit (lowest value) | - | - | 12 |
| Product C at 2 units per bundle | 12 | 2 | 6 |
Ask the bundle to take two units of Product C and the ceiling falls to 6, even while A and B still look abundant. That's the oversell protection. You can't promise a kit whose parts can't ship together.
What to watch after launch
- Lowest ratio first: Divide stock on hand by units per bundle for every component. Reorder the smallest result before it hits zero, not the item with the loudest sales chart.
- Don't pair a slow part with a fast hero: A limited-run accessory inside a bestseller turns the bestseller off. Sell the accessory alone, or keep a separate kit with a smaller promise.
- Shared stock: The standalone product and the bundle draw from the same units. Decide which one gets priority when stock is thin. Leaving both live means the single listing can zero the kit.
Fixed bundles are product or variant relationships. You choose whether the shopper picks a component variant on the product, or whether each bundle variant is a locked combination. Map that before launch and test it. Shopify supports fixed bundles, multipacks, and mix-and-match bundles. The first two come from the free first-party app. Mix-and-match generally needs a third-party app or, on Shopify Plus, a custom build with Bundles APIs.
Count option combinations before you publish and drop pairings you will never fulfill. A color matrix looks fine in a spreadsheet and then fails the moment one size is missing. If stock for several kits lives in more than one system, Cleffex Digital's guide to inventory software is a useful check on how those tools keep component counts honest.
Show Bundles in the Cart and Test Before Launch
A shopper should see the bundle name, the items inside it, the bundle price, and the saving, without opening a second tab. If the theme cart collapses that into one vague line, you will get support tickets that the kit "didn't include the trousers."
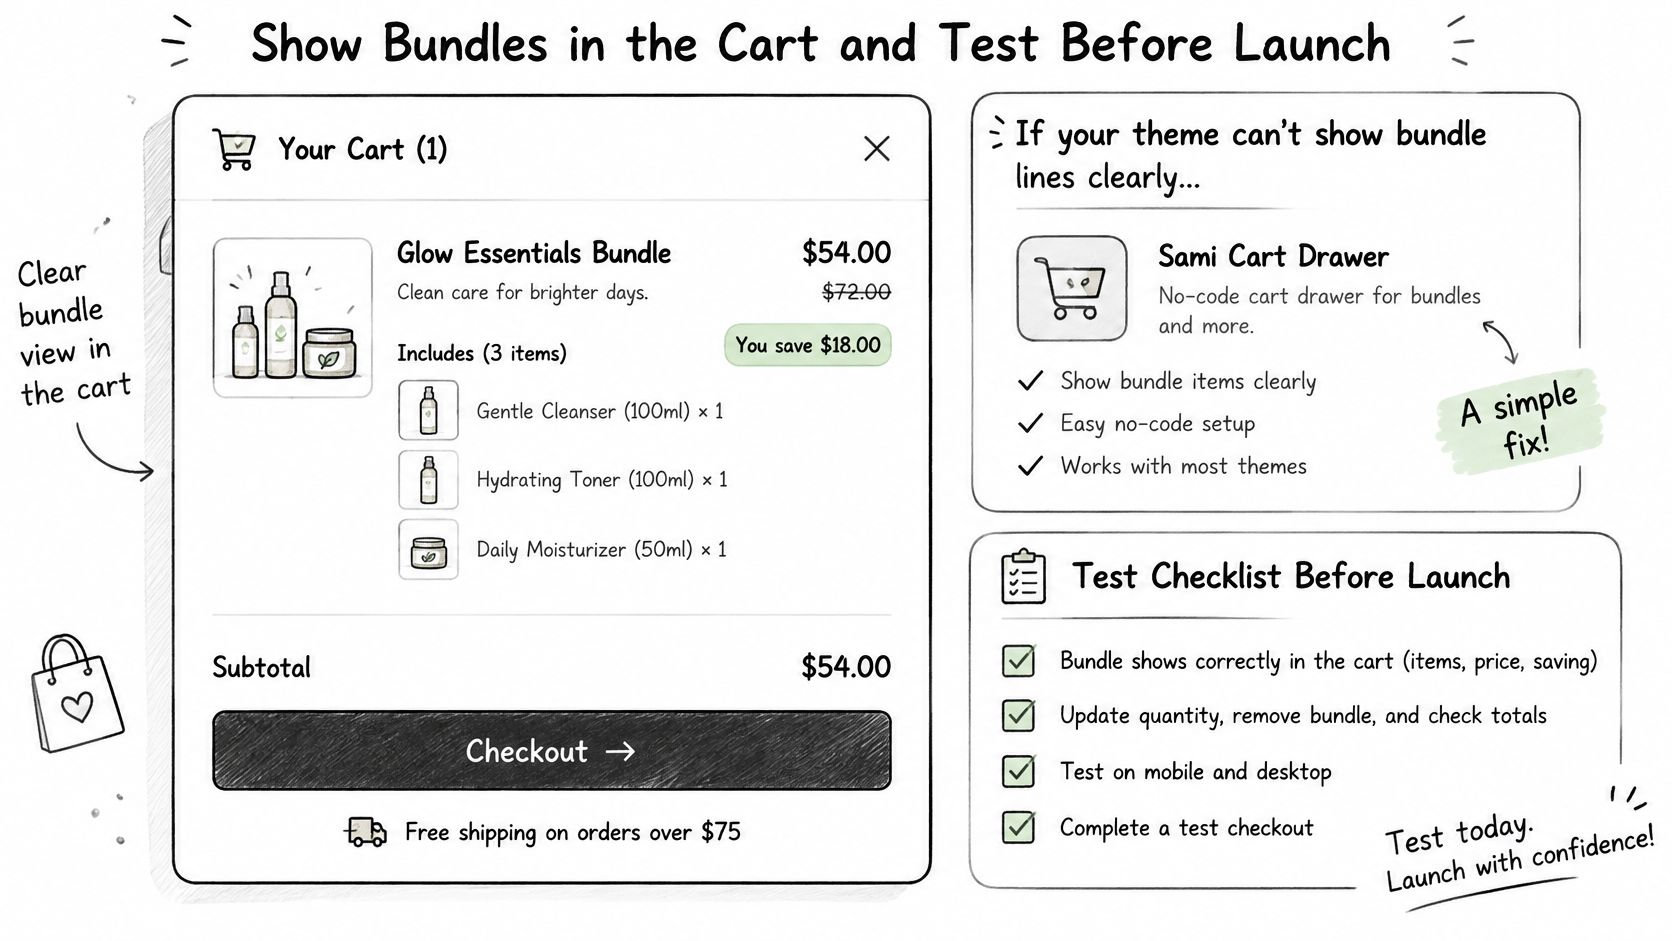
When the theme can't show those lines clearly, a no-code cart drawer is the fix that doesn't wait on a developer. CartServe is a configurable cart drawer that can hold bundle lines, stock, and currencies in one drawer. The layout choices are covered in this Shopify cart drawer walkthrough. Build the drawer so the kit reads as one offer and the components still appear as real items.
Six checks on a test order
- Place one bundle order and read the cart. You want the kit name and each included item, so a missing size shows up before a customer does.
- Confirm the saving on each component. The discount belongs on the lines, not only on a parent label finance never sees.
- Check stock movement. Each component should drop by the quantity inside the kit, and the standalone listing should move with it.
- Run a refund and a partial return. Component lines should reverse. A refund that only touches the parent leaves inventory wrong.
- Read the fulfillment slip. Every component has to be on it. A picker who only sees "Shirt and Trousers Set" will ship one garment.
- Match analytics to the charge. The bundle can report as one product sale, and component revenue still has to add up to the order total.
If a number is off, check component mapping first, then the discount rules. Don't add a second app to "fix" a relationship the first app already owns.
A short setup walkthrough helps if you want the admin clicks beside you while you run that list.
Start with one fixed bundle of products that already sell together. Read the limits, place the test order, and only then add variants or a mix-and-match layer. Developers should run the same six checks on a development store before the kit goes live. One clean order is worth more than a catalog of kits you can't refund.
ServeApps builds Shopify apps for the cart, for add-to-cart offers, and for order edits after checkout, which is where a bundle either stays clear or turns into a support ticket. CartServe can show the kit inside a cart drawer, and UpServe can offer frequently bundled items with a discount you set. Visit ServeApps to see how those apps fit the bundle you just tested.
What Is Upsell? Examples and How Shopify Stores Use It
What is upsell? Learn the definition, how it differs from cross-selling, and how Shopify stores use upsells to raise order value.
Read more →
Increase Conversion Rate on Website: 9 Proven Cart Tactics
Increase conversion rate on website with cart, upsell, and testing tactics. See what lifts AOV, cuts abandonment, and how to apply each one today.
Read more →
8 Self Service Store Examples: Benefits and Tactics
Explore 8 self service store examples, from cashierless checkout to post-purchase portals, with benefits, trade-offs, and tactics you can copy.
Read more →